Happy Easter!

Happy Easter everyone. Hope you have a great time enjoying the company of your loved ones. We are having a quiet family Easter this year, and as you can see the Easter bunny arrived early in our house on this Good Friday. And what a cute bunny she is!

Easter bunny

I decided to make my own Easter card for the blog this year. I have a Nikon DSLR, and I am still learning how to use it properly and trying to improve my photography technique. The card below was the result of over an hour's effort! Positioning the props, making sure the light is right, taking almost a hundred photos in various settings, sifting through them all to find the best one, editing the photo and adding the text. Hope you like it!

Happy Easter card

signature small

Tutorial: 'Bunny in a Hoop' Embroidery

Here is the tutorial and pattern for my fairy-bread-inspired Easter bunny from my previous post, made entirely from French knots.

DSC_0227-2

MATERIALS:

You will need:
- The pattern (download it as a PDF and print it to A4)
- 15cm embroidery hoop
- 20cm square of fabric of your choice (I used linen)
- Pilot Frixion or other fabric tracing pen
- Embroidery thread in various colours (or you can use your scrappy thread ball like I did)
- Embroidery needle
- Ribbon to decorate the top of the hoop

DSC_0701

STEPS:

1. Trace the pattern onto the fabric. You can refer to my tutorial 'Tracing an embroidery pattern' for this.

DSC_0708

2. Stretch the fabric onto the hoop, making sure the tightening knob is directly above the bunny.

DSC_0720

3. Pick two strands of one colour of thread, and get knotting! Now if like me you find French knots a little tricky at first, I strongly recommend you to watch this video tutorial. I used to really struggle with French knots until I watched this (and I had watched many many video tutorials on it). I just couldn't figure out what I was doing wrong. The trick is to stab the needle back into the fabric just to the right of the original hole while pulling the thread towards the left. I was stabbing the needle in the wrong place! If you are still finding French knots difficult, you can try colonial knots instead, a lot of stitchers find it easier than the French knot, and it would work just as well. Here is a great video tutorial on the colonial knot on Mary Corbet's Needle'n Thread - my embroidery bible (I have links to some of her other video tutorials in the next few steps).

DSC_0718

4. Make sure you get a good even coverage across the whole bunny with each colour, as you want a nice uniform mix of colours in the end. I used bold primary colours, not too many pastels or browns, and lots of white in between to make the colours 'pop'. Here is where my bunny was after the first night of knotting, and then after the second night. I filled all the remaining gaps on the third day.

DSC_0780 (2) combo

5. Once your knotting is finished, run a grey back-stitch all around the boundary of the bunny just to give it a little extra definition. This is hardly visible when you view the bunny from the front, but it tidies up the knots right on the edge.

DSC_0227-2 close up

6. Now to embroider the other details (all with two strands of thread). I embroidered the butterfly and the bee with a satin stitch, their flight paths with a running stitch, the butterfly's antenna with back-stitch and French knots, and the bee's wings with back-stitch. The grass was just simple random stitches all the way across the hoop.

DSC_0220-3

DSC_0220-4

7. Once your embroidery is finished you need to tuck the edges of the fabric behind the hoop so they don't show. I took a shortcut here, and just tucked the fabric behind the hoop and secured it in place with a few stitches (it doesn't look pretty, so I dare not post a photo here!). There is a way to do this 'properly' so the back of the hoop looks all nice and neat like the picture below, and here is a link to a great tutorial on Carina's Craftblog explaining how this was done. But if you are going to do it this way then make sure your fabric is a lot bigger (at least 30cm square) to begin with.


8. Tie a ribbon around the tightening knob at the top, and you are finished!

DSC_0236-2

signature small

Gone knotty

Remember this Easter fairy bread that I came across whilst browsing for Easter inspiration on Pinterest?

13194d5d7eec0e50b74a781546a21925-2

This is what it has turned into.

DSC_0211-2

Can you guess now?

DSC_0211-3

Ta-da!

DSC_0220-2

Yes, it's a bunny made entirely from French knots. And no, it didn't take that long to make at all. Two evenings stitching in front of the TV and a few hours the next day to finish off. When I saw the fairy bread on Pinterest, my first idea was to make a reverse applique bunny using a colourful Liberty print fabric. But then I noticed the little round sprinkles and got the French knot idea. (The reverse applique would have been way quicker! Why do I do this to myself?)

Despite my complaining, I really enjoyed making this bunny. Not just because I find the stitching therapeutic, but also because it turned out to be the perfect scrap-buster for my embroidery thread scraps. Now, if you embroider a lot, and if you are anything like me, you may have one of these little bird nests lurking around in your sewing box.

DSC_0714

It's a ball of embroidery thread scraps. All those bits of thread not substantial enough to go back on the floss bobbin, but still worth keeping just in case you need them for a small job. So mine just grows and grows. Well, this bunny used up almost all of that ball!

The tutorial and pattern for the knotty bunny are coming up next. Just in case there is someone else out there who gets their kicks out of making a few hundred French knots. Tell you what though - I wasn't too bad before but I'm certainly a French knot expert now!

DSC_0225-2signature small

Beginner crocheter!

I did it! I have completed Craftyminx's crochet school, and got my diploma. I would like to send a huge thank you to Dana (aka Craftyminx) for her awesome video tutorials. They were perfect for a beginner like me. The diploma doesn't really mean anything of course, it's a just a sweet little badge of achievement so people like me can use it on our blogs. So I am now officially a 'hooker', as well as a 'sewer'! Ha ha! Love some of these craft terms. I prefer 'sewist' and 'crocheter' I think.


We made a pair of wrist warmers as part of the class crochet-along - they may come in handy soon (no pun intended). We are now going into autumn here in South Australia and there is a decided chill in the air. The grapevines that start from the bottom of our garden are beginning to turn a vibrant red - I will take a picture for you once they are in their full autumnal glory.

DSC_0120

Anyway, I digress.  I am now ready for my first proper crochet project, flying solo.  I am still a total crochet rookie of course, but I can now do all the foundation crochet stitches, read patterns, work texture into the item, make simple granny squares, work in the round, and seam items together. So all the basic foundation skills.  I even picked up some crochet/knitting lingo such as 'frogging' - it means unraveling a piece because you rip-it rip-it rip-it out.  Love it!

To get some inspiration for future crochet projects I have been browsing through Pinterest and Ravelry (a huge global online database for crochet and knitting). I used to think crochet was mainly for colourful afghan blankets. But it has so many more applications than I realised! I even saw a pattern for a bicycle seat cover. Maybe I should make it for my cyclist husband as a birthday present - no better way to destroy his street cred amongst his road cycling buddies.

So before I leave, here is a small serving of crochet inspiration for you (all links back to the original images and the websites they came from are on my Pinterest board here). See what I mean about all the different applications?


Tutorial: Easter Chick

I have missed working with felt, so I decided to make a felt chick for Easter. It took me quite a long time to draft up the pattern (as let's face it, I am no artist). My first few attempts at drawing a chick were quite woeful (and hillarious). The poor thing looked like a mutant alien chick from outer space. I persevered and in the end it started to look like a proper chick (and quite cute, even if I say so myself). My toddler certainly adores it - though he keeps calling it 'Duck!'. I guess it does look a bit like a duck!


MATERIALS:

You will need:
- The pattern (download it as a PDF and print it to A4)
- Felt in yellow, orange, and red
- Embroidery thread in colours matching the felt, and black (for the eyes)
- Stuffing material (e.g. Hobby-fill)
- Two small black beads for the eyes (2-3mm)
- Tools - scissors, small curved scissors, embroidery needle, stapler, pins
- Blusher for the cheeks (optional)


STEPS:

1. Cut out each pattern piece leaving a small margin of white paper around the pattern. Pin or staple each pattern piece onto the felt.. (I personally prefer to staple rather than pin, as I find pins distort the felt/pattern, but it's a personal choice). Cut each piece out of the felt, using the small curved scissors for smaller shapes like the feet and hair tuft.


2. Prepare the bow first. Fold the bow front so that the ends meet in the middle of the bow at the back.


3. Attach the 'bow back' to the back of the 'bow front' with a couple of small stitches.


4. Fold the 'tie' around the centre, pulling it tight, then stitch at the back, securing the bow (make sure the stitches don't show on the front side of the bow).


5. Embroider the front of the bow with two small rows of back-stitch on each side, if desired.

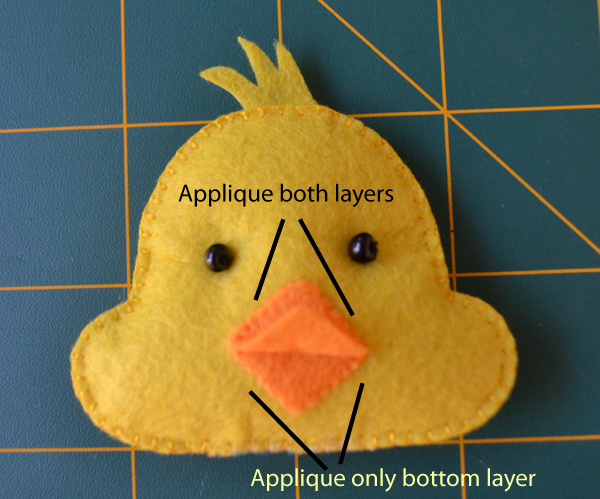
 6. Prepare the head. Position the two layers of beak on the front layer of the face. Applique both layers of beak onto the face on the 'upper' side of the beak, and only the bottom layer on the 'lower' side of the beak (see picture below for diagram). Fold the top layer of the beak upwards (so it looks like his mouth is open), then secure in place with a couple of small stitches in the middle.  Sandwich the tuft of hair between the two layers of the head, then blanket stitch all the way around (trapping the tuft between the layers), leaving a 1 inch hole at the bottom. Stuff the head with filler through the opening, then finish the blanket stitching around the head. To attach the eyes, use a single strand of black thread, make a small knot at one end. Push the needle up through the back of the head, all the way through and out the front, put the bead on the needle, then put the needle down through the same hole. Pull the thread quite tight so the 'eye' sinks into the head a little. Repeat 3 times. To finish, thread the needle through the filling in the middle of the head and away from the eye, bring the needle out, snip the thread right close to the felt, tug the felt a little and the end will disappear into the head. The little knots at the back of the head should also have practically disappeared into the back of the head (but a dimple will show on the back of the head for each eye).


7. Blanket stitch the body, wings and feet together, stuffing each piece using the same method as the head.


8. All parts are ready, so we can now assemble the chick. Start by sewing the wings onto the body. Put your needle through the existing blanket stitch holes in the front of the wings for a neater finish (as I am doing in the picture below). If you can manage it, sew the wing onto the front layer of the body only so the stitches don't show on the back of the chick's body. This can be a little fiddly, so if you are struggling you can always sew all the way through to the back. Next sew the head on, then the feet, and finally the bow.


9. Apply a little blush with a cotton bud, if desired. You can also use fabric paint.


Enjoy your cute little buddy!

Notes:
- This tutorial has some trickier parts which could be a challenge for a complete beginner, and requires knowledge of hand stitches such as blanket stitch, applique stitch and back stitch.
- Due to small parts this toy is not suitable for babies or toddlers. If you want a young child friendly version you can embroider the eyes, or just use a small circle of black felt instead of beads.


Meanwhile in South Australia...

... I have been swamped with customer orders! Hence the radio silence. After posting the tutorial for the teddy bear taggie blanket, I thought I would put it in my Etsy shop as well, and it proved to be quite a hit! I have also been working on some custom orders, including some patchwork and linen bibs and burp cloths. I am so pleased with how they came out that they will be going in the shop this weekend.


In other news...

Those who follow my Facebook page would have seen that I am learning to crochet. The call of those cute amigurumi animals was just too great to resist! I used to crochet as a child - taught by my grandmother - doilies and dish cloths in headache inducing colour combos, using my grandma's wool scraps. I didn't think I would remember any of it - and I don't. The stitches I mean. But as soon as I picked up the yarn and hook it was instant recall in terms of how to hold them and that fluid crochet motion. That was still stored somewhere in the depths of my memory banks - a bit like riding a bike I guess.

The course I am doing is Craftyminx's online crochet school - it's great. It's a series of 23 video tutorials and suitable for complete beginners. I am more than halfway through the course. I can now do all the main crochet stitches (below is the swatch I made for the class). And now learning to work with textures and working in the round (rather than in rows - fundamental for amigurumi!). I absolutely LOVE it. There is something so therapeutic about that repetitive crochet motion. I am already looking forward to winter evenings curled up on the couch and watching telly whilst crocheting hats and  booties (such a nanna!).


And can you believe Easter is just around the corner? I have had almost no time with everything else going on, but I have managed to make a small start on my two Easter projects. Firstly, I am making a felt easter chick ornament which I am just drafting the pattern for, and it will come with a full tutorial as well (hopefully next post!). I have also started a 'wall art' piece after coming across this picture whilst browsing Pinterest for some Easter inspiration. For a split second I thought I was looking at fabric - and then realised it was a piece of bread! But still, it gave me a cool idea... Can you guess what it is going to be? ;-)


Before I go, here is a little more Easter inspiration for you (links to all images and the original websites they came from are on my Pinterest board here). Tell you what though - I am still not used to celebrating Easter and Christmas in the southern hemisphere. Browsing for Easter inspiration on Pinterest is weird - everything just screams 'SPRING!!' but it's now autumn here. It's quite odd! Not quite as odd as decorating a christmas tree with snowflakes whilst it's 40C outside though. ;-)


Until next time my lovely readers!


Related Posts Plugin for WordPress, Blogger...