
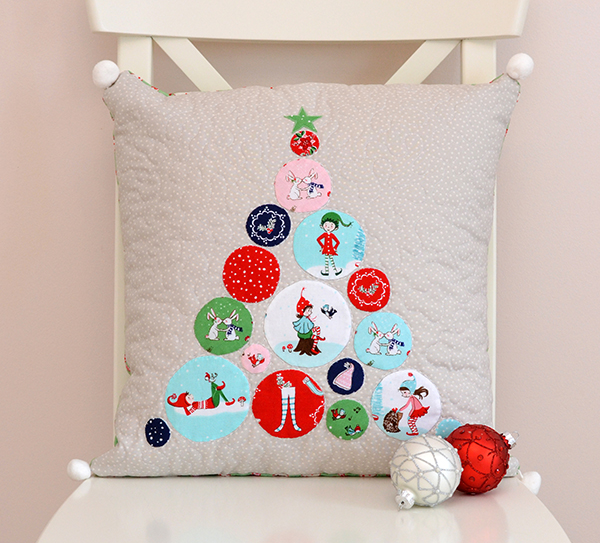
Welcome to my stop on the Pixie Noel blog hop! This latest Christmas collection by fellow Riley Blake designer Tasha Noel is adorable, just like all her fabric! Her booth at spring quilt market was in one word incredible (there is a picture of it in my market round-up post in case you haven't seen it). So I am delighted to be taking part in her blog tour today with my Pixie Noel Christmas tree cushion.


Pixie Noel was made for fussy cutting in my opinion, so I thought interfaced applique circles would be the perfect way to display the cute details in this collection. This is how I make my applique circles:
- Prepare circle templates in varying sizes (1" to 3" in 1/2" increments) by cutting circles out of thin template plastic - I get mine from Spotlight in the quilting section. These templates make it so easy to centrally align the motif that I am fussy cutting. I have a big stash of these templates in all sorts of shapes that I keep at hand for future projects.
- Centre the motif under the circle template, and trace around the perimeter with a Pilot Frixion pen. If the fabric is transparent enough you should do this on the reverse side of the fabric. If not, trace around the circle on the right side of the fabric, then later you can transfer the circular mark onto the reverse of the fabric on a window or lightbox.
- Cut out the fabric leaving at least 1/4" allowance all the way around - I tend to cut a rough square of fabric with scissors. This doesn't need to be precise.
- Cut a piece of nonfusible lightweight interfacing the same size as your fabric.
- Place the right side of your fabric against the fusible interfacing, then machine stitch all the way around the traced line, closing the circle with your stitches. Tip: use a very short stitch length and sew slowly to make your circle as round as possible.
- With pinking shears trim off all excess material all the way around. Tip: get as close to the stitches as you dare, especially if the circle is small. Less bulk = neater circular shape.
- With pointed scissors cut a large + shape on the back of the interfacing, without getting too close to the edges. Turn the shape inside out through the + , using a blunt pointy object push out the seams until you have a neat circle. Press.
- Applique onto the background fabric by hand or by machine.
Easy peasy! You can also do your circular shapes as raw edge applique using fusible web, but I prefer the interface method as the circles 'puff' up a little, adding a three dimensional effect to the cushion front. Perfect for baubles!

For the quilting, I stipple quilted around the Christmas tree (I am getting faster at this finally!), and hand-quilted around each bauble with DMC Perle cotton no:8. I didn't have enough of the large pompom trim for the whole perimeter of the cushion, so I added one pompom in each corner - I quite like the effect that created! The backing is from Elea Lutz' collection Little Joys - it was such a good match.


Pixie Noel is now available in shops so you can get your Christmas sewing on! If you would like more inspiration, check out other fun projects in the blog hop over the course of this week and next, which you can follow along on Instagram (#pixienoelfabric and @tashanoel1). Thanks for stopping by!


This is so fun Sedef! I love it :-) I agree - Pixie Noel is just MADE for fussy cutting - all those cute pictures on the fabric! I can't wait to see what the other hoppers have made! Megan xx
ReplyDeleteJUST ADORABLE! THANKS FOR SHARING!
ReplyDeletemsstitcher1214@gmail.com
Such a cute pillow! You are so very creative!
ReplyDeleteGreat tutorial! I have to practice more on my circles so they'll be more rounded! I also just noticed that I have the exact same chair as the one in your photo - I was looking for a chair for taking photos of cushions, and found one in the council throwouts! A coat or two of white paint, and voila! Now I just might have to make one of these cushions!
ReplyDeleteIt's really cute! I might have to copy, as I'm very scroogy with my Christmas decorating, and really should get into the Christmas spirit a more!
ReplyDeleteI am truly love this pillow. It is so cute. I will try to make this one as a Christmas gift for my guy. Thank you for sharing
ReplyDeleteGreat article. Happy to visit your blog. Thanks for sharing.
ReplyDeletenon woven bag machine